My Journey, Welcome!

Welcome to my blog! I am Mellie, and this is my journey. I am a recent, non-traditional, college/culinary student. I hope that you'll stick around for all that's to come. I hope to have tips and tricks, recipes, photo's, laughter, fears, tears, personal goal's and accomplishments and more! Please, follow me. If you have any questions, feel free to contact me. I look forward to the future!


Photobucket
Showing posts with label food. Show all posts

Wednesday, January 23, 2013

Muffins, again.

     This Tuesday, in baking lab, we made some more muffins. The last time that we made them, we used buttermilk. We were the only group that got to use buttermilk, then. This week we all used buttermilk and instead of blueberries, this time we used dried cranberries in our group. The muffins turned out pretty well! We also used the creaming method, to make sour cream muffins, and chef coached us through the process, using the kitchen aid mixers. It's a lengthy process, and in the end, it is so worth it. What your result is, is a moist, and fluffy muffin that was almost to die for. I don't think anything can compare to the sour cream muffins and I am going to definitely be making some of these at home. Yum-Yum!

     Chef also made a fresh batch of streusel topping, using only sugar, flour and butter. It tasted similar to an unbaked sugar cookie dough.

     Thanks to another group, who did not measure properly, we got to see the results of that. What was left was a sunken/concave of a muffin. They browned up nicely, though they did not have a crown. Those would have been beautiful muffins had they risen properly!
It's definitely interesting to see what can happen, and what result's you achieve with various ingredients in place of. I'm loving it more and more.


Here's our pan of sour cream muffins with streusel topping.

Thursday, January 17, 2013

Whew!

The past 2 weeks have been a whirlwind of excitement and sickness. I haven't hardly had time to breathe, much less blog! I have learned SO MUCH, already, and I'm hungry for more.

I am having fun with my classmates. The above photo is from our first day actually baking, in bakery lab. Those are country biscuits. Man, were they good! So easy to make, too. Who knew?!?!


This is 2 of my classmates, Joe and Shanna. They are part of my group in baking lab. The photo's include the 4 of us :)

Today, we made blueberry muffins, and chocolate chip muffins (because Troy is allergic to blueberries ;)  )

I hope to have more and more pictures to share here on the ol blog, real soon.


Friday, October 5, 2012

French Macarons-Chocolate

 Anyone with culinary knowledge knows how difficult making "real" French macarons can be. In fact, they can be downright difficult, to the point of failure. Successful macarons have perfect "feet" and are light & airy. The outer cookie is a bit crunchy, while the inside is chewy. I am in no way a macaron expert, nor am I a baking expert, yet, somehow I managed to make these delightful little morsel's successfully. This is the recipe that I used and my macarons came out perfect.
The first task was to make the almond "meal", or flour. This was the first time I'd ever made it. I had heard that it was also a daunting task. I ground my almonds in my food processor, sifted them, then ground in my blender, sifted again, then ground them in my food processor a last time before my final sifting. I also added my cocoa to the mixture, to be safe. I followed the recipe exactly. My opinion is, this recipe is fool-proof ;)
Here are some photo's as I went along with the recipe. In the next to last, and last, you can see the "feet" that I spoke of. I hope that you'll try making them on your own!


Tuesday, March 27, 2012

Almond Cupcakes & Recipe


Hello! It's been quite a while since I have blogged. In an attempt to be a better blogger, a wannabe food blogger, I have a recipe to proudly share. :)
On a completely different subject, I want a new camera :)
Last night, after I made an amazing pot of "goulash", I decided to make cupcakes, last minute. With no pre-planning, I went into the kitchen and started rustling up ingredients.
I always have flour, sugar, salt, baking powder and butter. I knew that I wanted a cupcake but I'm out of cocoa! I had no chocolate! What in the world was I thinking?
Then, it hit me, I had some Almond Extract! I began making Almond cupcakes and here's how I did it:

  • 1 1/2 cups all-purpose flour (I sifted my flour)
  • 1 3/4 teaspoons baking powder (I sifted this with my flour)
  • 1 cup white sugar
  • 1/2 cup margarine, softened
  • 2 eggs
  • 1 teaspoon vanilla extract
  • 1 teaspoon almond extract
  • 3/4 cup whole milk (I substituted with 2% milk)

    • 1/2 cup brown sugar
    • 1/2 cup margarine
    • 2 tablespoons light corn syrup
    • 1 tablespoon vanilla extract (I omitted this and used almond extract instead)
    • 1/2 cup heavy cream, or as needed (again, I used 2% milk, it came out perfectly)
    • 1 pinch salt

  • 3/4 cup salted butter, softened (1 1/2 sticks)
  • 2 cups confectioners' sugar, sifted(I drizzled in some milk while beating the sugar and butter, maybe a tablespoon or two? It is butter-CREAM, after all :D I also added some almond extract, a few drops did the trick. My frosting was light and airy and delicious-o! )

    Directions

    1. Preheat oven to 350° F. Line 12 cupcake cups with paper liners. In a bowl, whisk together the flour and baking powder. (again, I sifted the two together)
    2. In a mixing bowl, thoroughly cream together the sugar and 1/2 cup of margarine until very well blended. Beat in the eggs, one at a time, until thoroughly combined, and stir in the vanilla and almond extracts. Gradually beat in the flour mixture, alternating with the milk, in several additions. Spoon the batter into the prepared cupcake cups, filling them about 2/3 full.
    3. Bake the cupcakes in the preheated oven until a toothpick inserted into the center of a cupcake comes out clean, 20 to 25 minutes. (My oven cooked them perfectly in exactly 20 min.)
    4. To make caramel, Place the brown sugar, 1/2 cup margarine, corn syrup, and vanilla into a large saucepan over medium heat, and bring the mixture to a boil. Reduce heat, and simmer until thickened, 3 to 4 minutes; remove from heat and allow to cool to warm (not hot) temperature. Add the cream, a little at a time, until the caramel has the consistency of honey. Mix in the pinch of salt, and allow to cool to room temperature.
    5. Beat the salted butter with confectioners' sugar in a bowl with an electric mixer on medium speed until the mixture is fluffy; slowly add and beat in the caramel, a tablespoon at a time, beating until the frosting is smooth.

    As you can see, I kind of adapted this recipe and went off on my own with it. It worked out pretty favorable if I do say so myself!
    This isn't the first time I made butter-cream frosting and it certainly won't be the last. It's SO easy. One note I will give: Be extra careful with the amount of almond extract because it will overpower the recipe very quickly if not used in moderation.

Sunday, January 15, 2012

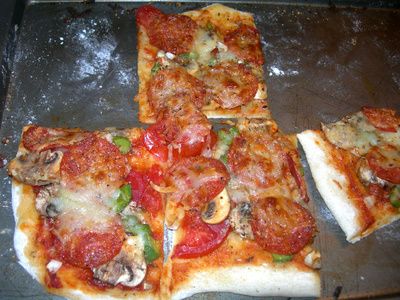
Pizza...anyone?

I don't know what has gotten into me the last 3+ years. I packed away my bread machine, which I just so happened to adore, some years ago and I forgot all about it. Until last week. I broke that puppy out and I have been making a plethora of bread, for day's. We've had pizza, twice, we've had country white bread, we've had parmesan garlic bread. All in a week? Yes!
I love making homemade bread's but let's face it, it's time consuming. I have no patience for the whole, mix-rise-knead-punch down-let rise again process and frankly, my bread machine bread tastes just as good, to me, as any hand-made bread!
My guy's just happen to love pizza. Today my son said, "Mom, I love you....thank you for taking out your bread machine again", after I'd just made 2 fresh pizza's.

I thought I would share my pizza dough recipe here, it's so wonderful and so easy!

**I always add liquids, then solids to my bread machine. That's the way that I read to do it when I first got my machine so I carried on with it. To be 100% honest, unless you're using a timer, to put off the actual mixing of the ingredients, I don't see the biggie.
Be sure to do this according to your direction's (unless, like me, you don't care!)**

1C. water
1 tbsp. olive oil (EVOO makes a more flavorful crust, use what'cha got)
1 tsp. salt (I use kosher, it's all I buy)
3C bread flour (If you want whole wheat crust: use half wheat, half regular flour)
1 1/2 tsp active dry yeast. (I even have some that says it's for pizza dough, specifically) If you use rapid rise, it won't matter.

Set your machine to dough and let 'er rip!

**I usually let mine sit for about 30 minutes after the buzzer goes off, to let it continue to rise. Then, I punch it down, right in it's pan and let it rest a few minutes before I remove it from the pan. I use floured hands, it's a sticky job!**

The rest is up to you....roll it out...use your hands to smoosh it around...whatever, it's all up to you! Topped with fresh ingredients, it will melt in your mouth!

Till next time...do good thing's!

Photobucket